The Fluminer L1 has quickly become a favorite among home miners for its perfect blend of 5.3 GH/s hash rate, remarkable energy efficiency (1200W), and, most notably, its ultra-quiet operation at under 40dB. This makes it ideal for mining Scrypt-based coins like Litecoin (LTC) and Dogecoin (DOGE) without disturbing your home environment.
If you’ve just unboxed your new Fluminer L1, this step-by-step tutorial will guide you from setup to optimization, ensuring you start mining efficiently and safely.
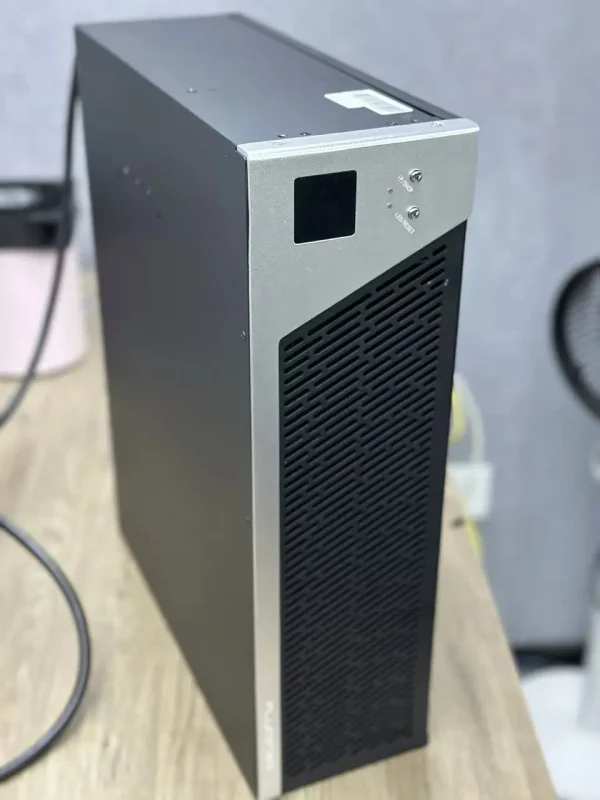
Unboxing and Hardware Overview
Carefully unbox your Fluminer L1 and ensure you have all the components:
- Fluminer L1 Miner Unit
- Power Cable
- Ethernet Cable(self provided, Fluminer L1 support RJ45 Ethernet 10/100/1000M and WiFi)
- User Manual (highly recommended to keep)
Take a moment to familiarize yourself with the unit. Locate the:
- Power Input: On the rear of the unit.
- Ethernet Port: For a stable network connection.
- Control Panel: Features an LCD screen for displaying hash rate, temperature, and other real-time stats.
- Ventilation Grills: Keep these clear of obstructions for optimal cooling.
Hardware Connections: Power and Network
This is a crucial step for stable operation.
Step 1: Connect to Power
Use the provided power cable to connect the miner to a dedicated wall outlet. Avoid using extension cords or power strips, as the miner draws a consistent 1200W and requires a stable, high-quality power source to prevent issues.
Step 2: Connect to the Internet
For the most reliable connection (essential for minimizing rejected shares), use the Ethernet cable to connect the L1 directly to your router. The L1 also supports Wi-Fi, but a wired connection is always preferred for mining.
Step 3: Power On
Switch on the miner. You should hear a faint hum from the fans and see the LCD display light up, showing boot-up information.
Software Configuration: Accessing the Interface
The Fluminer L1 is configured via a web interface.
Step 1: Find the Miner’s IP Address
- Method 1 (Easiest): Check the LCD screen on the miner. It often cycles through and displays the IP address.
- Method 2: Log into your router’s admin panel (usually via
192.168.1.1 or similar) and look for the list of connected devices (DHCP client list). You should see a device named “Fluminer” or similar with its assigned IP.
Step 2: Access the Web Interface
Open a web browser (Chrome, Firefox, etc.) on a computer connected to the same local network. Type the miner’s IP address directly into the address bar and press Enter.
Step 3: Log In
You will be greeted by a login page. The default username and password are typically admin/admin or root/root. Consult your manual for the exact defaults and change these credentials immediately after your first login for security.
Configuring Your Mining Pool and Wallet
This is where you tell the miner where to send its computational power and where to receive your earnings.
Step 1: Choose a Mining Pool
You cannot mine solo. You need to join a mining pool. Popular choices for Scrypt coins include:
- LitecoinPool.org
- ViaBTC
- F2Pool
- Antpool
Create an account on your chosen pool’s website.
Step 2: Locate Your Pool Configuration
In your pool account, find the “Worker” or “Help” section to get the Stratum Server URL. It will look something like: stratum+tcp://ltc.pool.example.com:3333.
Step 3: Create a Worker
Inside your pool account, create a new “worker.” This is typically named yourusername.workername (e.g., miner123.worker1).
Step 4: Configure the Miner
In the Fluminer L1’s web interface, navigate to the “Miner Configuration” or “Pool” section.
- URL: Paste the Stratum Server URL you copied from your pool.
- Username/Worker: Enter your full worker name (e.g.,
miner123.worker1). - Password: This can usually be left as
x or 123.
Step 5: Set Your Wallet Address
This is critical. Your mining rewards are sent to the wallet address you configure within your pool account online, not typically in the miner itself. Ensure your Litecoin or Dogecoin wallet address is correctly set in your pool profile settings.
Step 6: Save and Apply
Click “Save” or “Apply.” The miner will restart its mining process and should shortly appear as an active worker on your pool’s website dashboard.
Optimizing Performance and Monitoring
- Monitor Stats: Use both the LCD screen and the pool’s online dashboard to monitor your hash rate, rejected shares, and hardware temperature. A good temperature range is typically between 50°C and 70°C.
- Placement: Place the miner in a cool, dry, and well-ventilated area. Avoid enclosed spaces like a closet, as adequate airflow is key to longevity and performance.
- Noise: Enjoy the quiet! At ~40dB, the L1 is one of the quietest miners on the market, perfect for home use.
Ready to upgrade? Check out the more powerful Fluminer L1 Pro (6G) model on our site for even higher performance!
Troubleshooting Common Issues
- Cannot access web interface: Double-check the IP address and ensure your computer is on the same network.
- Worker not showing on pool: Verify the Stratum URL and worker name for typos. It can take a few minutes for the pool to display your worker.
- High rejected/stale shares: This usually indicates a poor network connection. Switch to a wired Ethernet connection if you are using Wi-Fi.
- High hardware temperature: Improve ventilation around the miner. Ensure the intake and exhaust are not blocked.
Conclusion: Start Mining Smartly
Setting up your Fluminer L1 is a straightforward process that unlocks the door to efficient and quiet home mining. By following this guide—securing your hardware connections, properly configuring your pool details, and ensuring adequate cooling—you’ll be well on your way to earning Litecoin and Dogecoin.
The L1’s blend of solid Scrypt algorithm hash power, low power consumption, and library-quiet operation makes it a standout choice for beginners and enthusiasts alike.
Interested in the Fluminer L1 for your home mining setup?
Find the best price and purchase your unit securely from our official partners:


 Bitmain
 Iceriver
 Bitdeer
 BOMBAX
 DragonBall
 Elphapex
 Fluminer
 Goldshell
 iBelink
 Ipollo
 Jasminer
 Volcminer
 Aleo Miner